Update Existing Airtable Records with Airtable Forms (No Paid Tools Needed)
If you’ve ever tried using Airtable forms to update existing records, you’ve probably realized it’s not something Airtable supports out of the box. Forms in Airtable are designed to create new records, not edit old ones.
That’s totally fine when you’re collecting fresh data. But what if something changes and you need to update an existing record?
Let’s say a client books a call using your form. After the call, they fill out a feedback form. You’d expect their feedback to be added to the original booking, right? But instead, Airtable just creates a new record. Now you’ve got two disconnected entries for the same event.
Or maybe you're tracking projects. Your team submits a form with project details like client name, location, type, and more. A few weeks later, something changes, so they resubmit the form. Instead of updating the existing project record, Airtable creates a brand new one. Now you’re left with duplicates, outdated information, and a growing mess.
Luckily, there’s a way to do this.
You can build this kind of update functionality yourself directly inside Airtable with no paid tools required, just a little manual setup. (Though if you want a more polished solution with less effort, tools like Fillout offer a generous free plan and make this a breeze.)
But if you're on a tight budget or just like building things yourself, here’s how to do it.
Step 1: Set Up Your Base Table
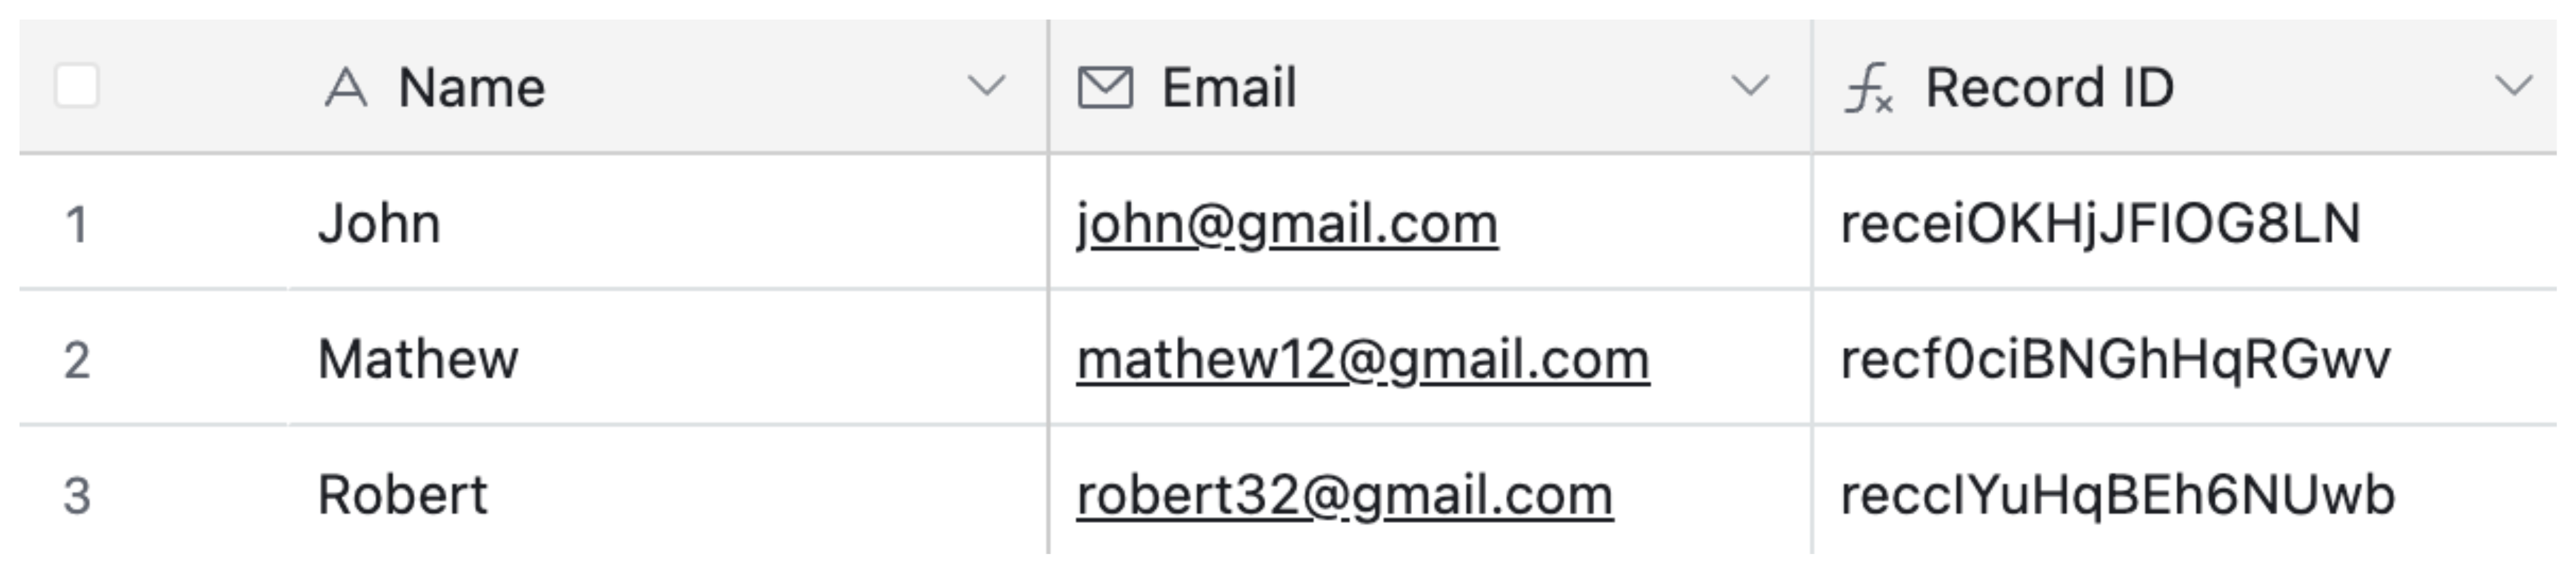
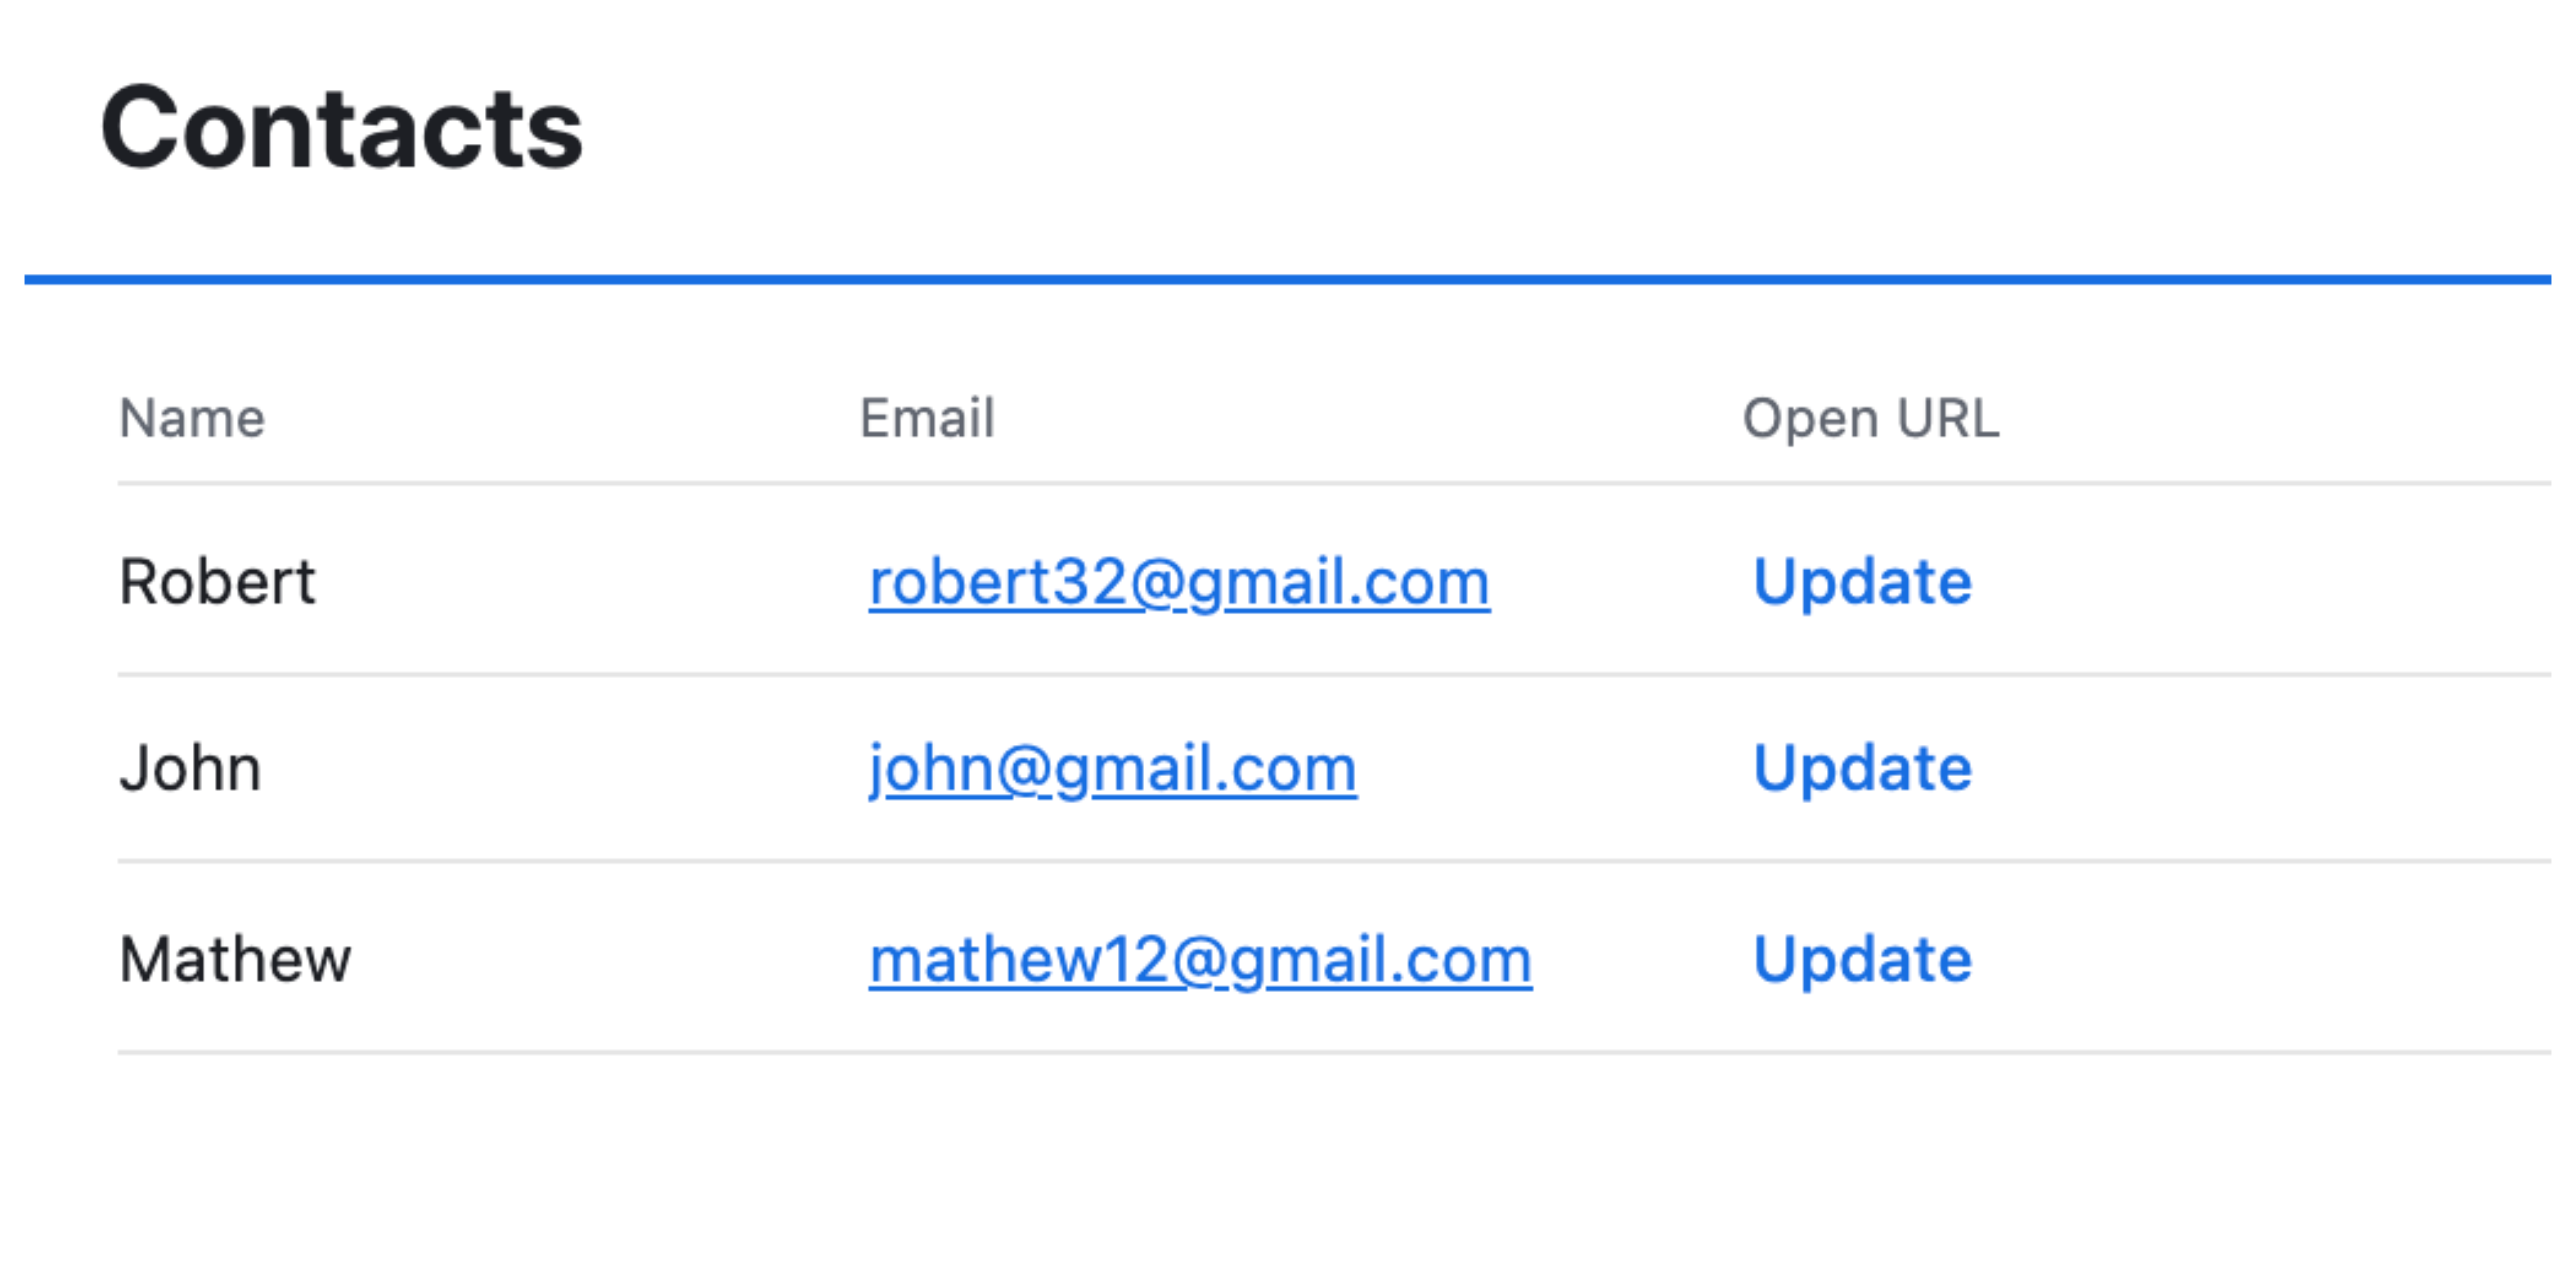
Let’s say you have a basic table called Contacts with two fields: Name and Email.
You want to be able to click a button, open a form, update the email address (maybe it’s changed from .com to .io), submit it, and see that change reflected instantly in the original record.
To do this, the first thing you need in your base table is a Record ID.
This is a unique identifier Airtable automatically assigns to every record. We’ll use it to know which record to update.
Create a new formula field and name it something like Record ID. Use the formula RECORD_ID()
Step 2: Create an “Updates” Table
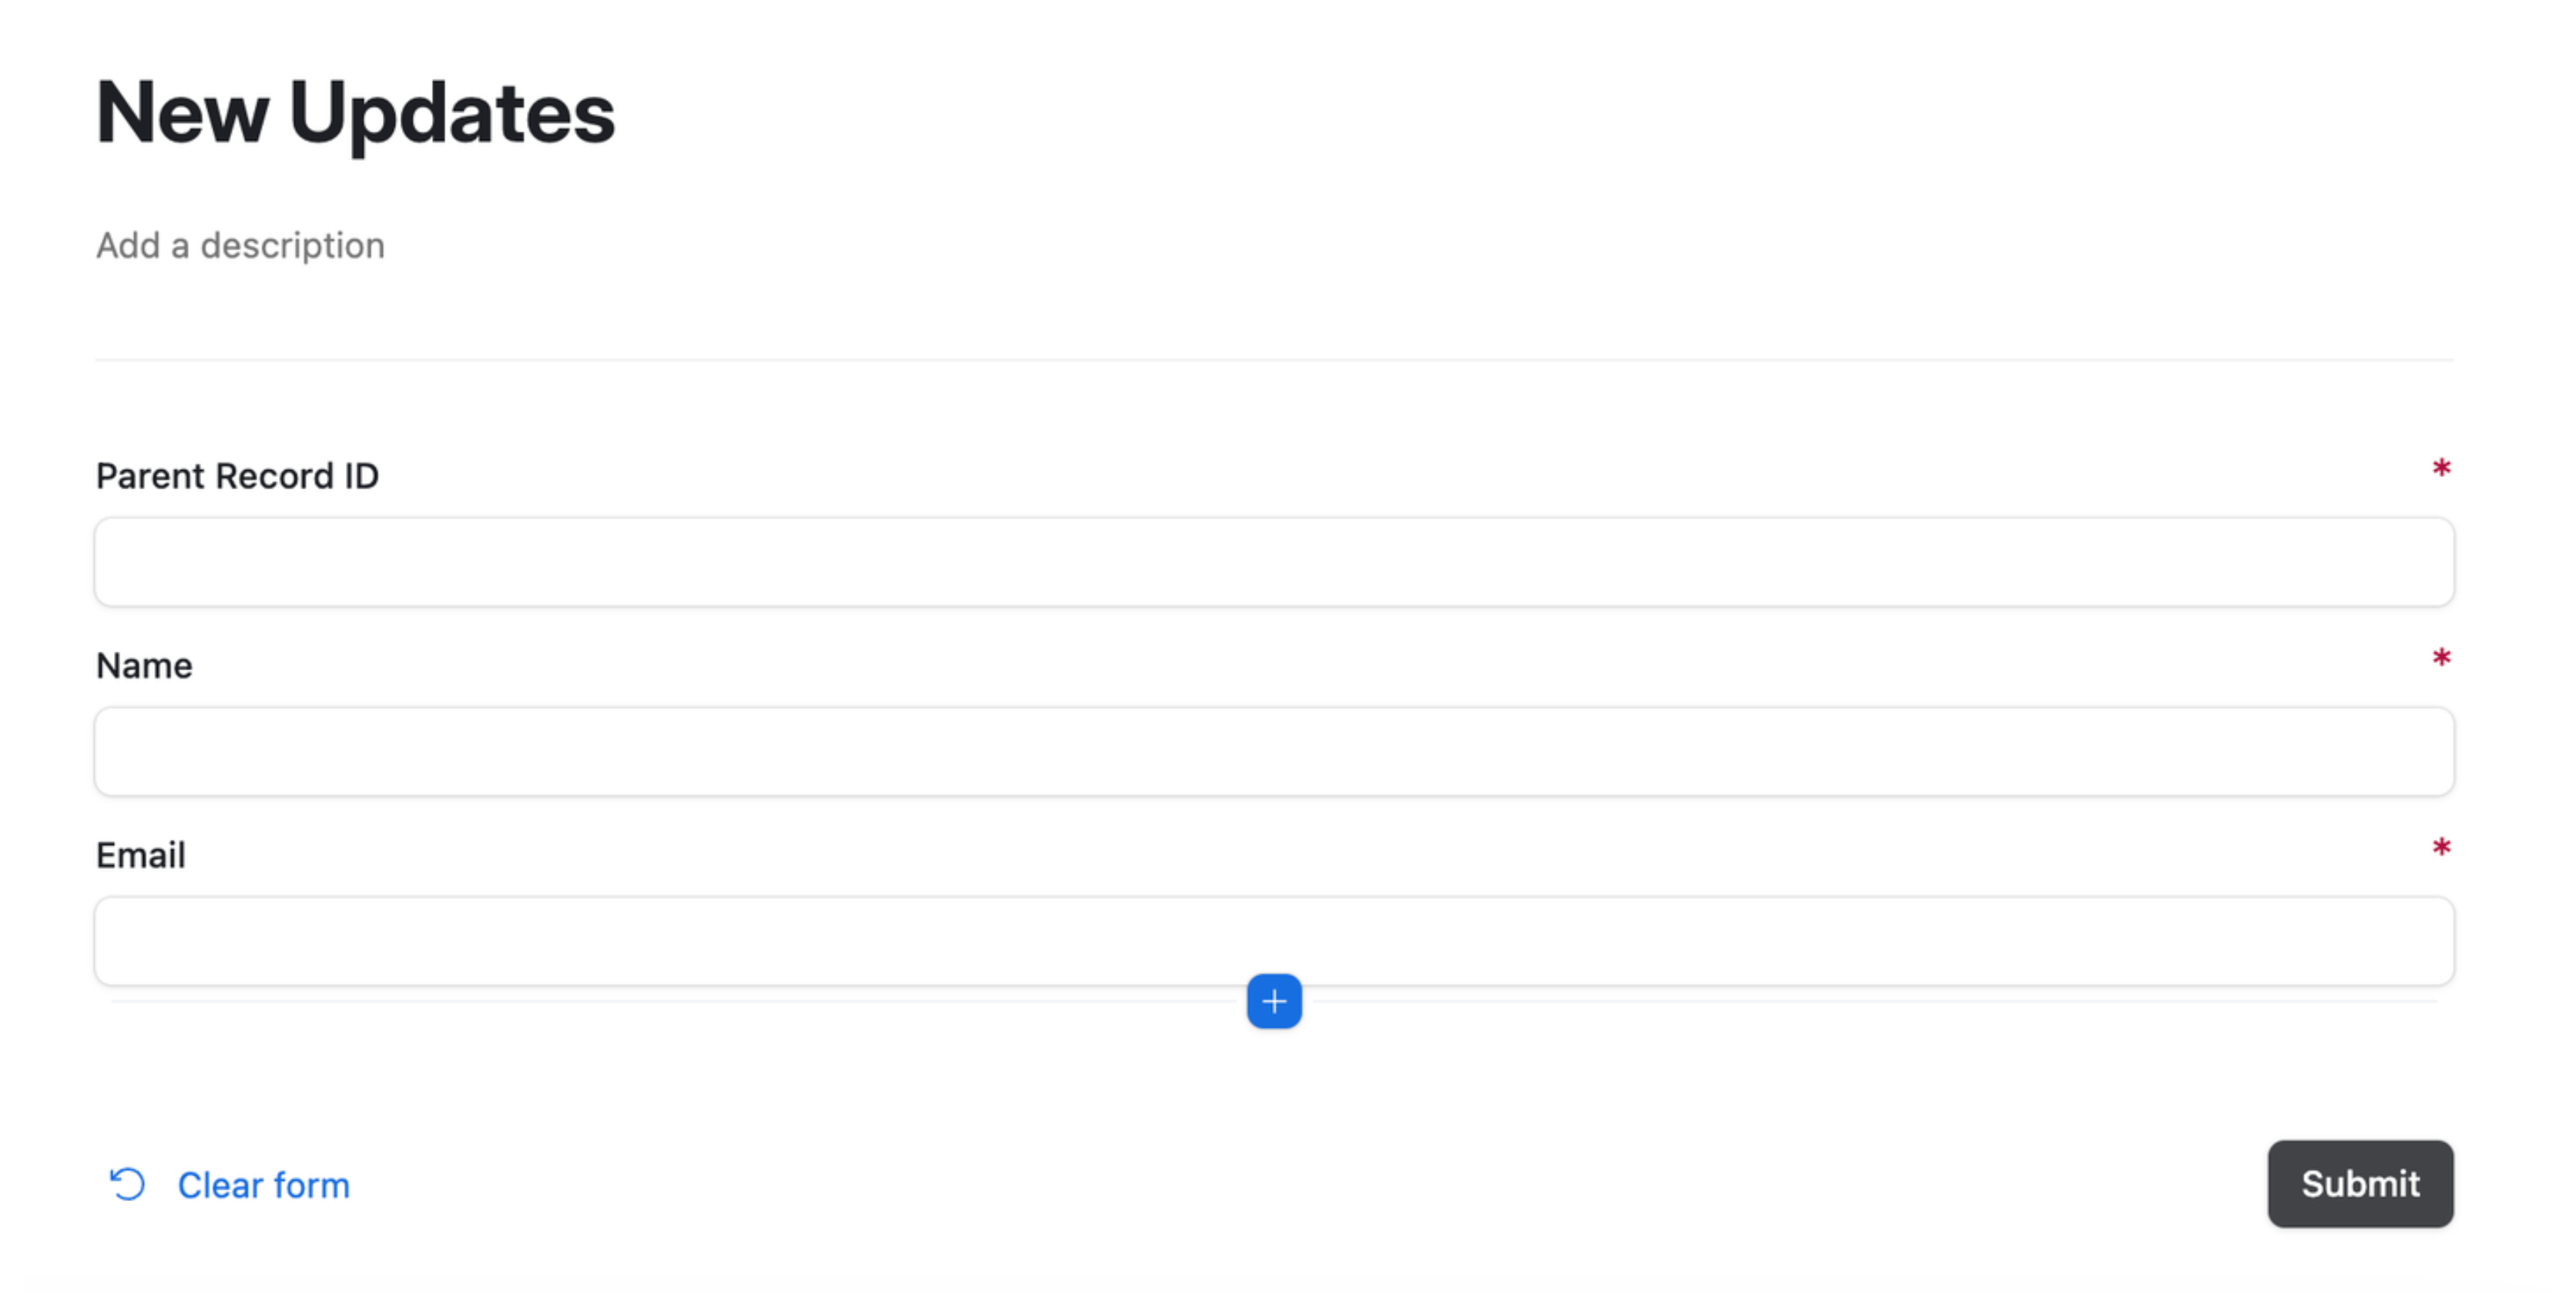
Next, create a second table and call it Updates.
This table is where new form submissions will go. Think of it as a temporary inbox where updates are collected before being pushed back into the original records.
At a minimum, make sure this table mirrors the fields you want to update. So if your main table has Name and Email, your Updates table should have those too. You will also need a field to hold the Parent Record ID, which is the link back to the original record.
In the Updates table, make sure the record ID field is a text field, not a formula. We'll be passing that ID into the form manually, so it doesn't need to generate automatically.

Step 3: Build the Form
Now, create a form for your Updates table.
Include all the necessary fields, such as the parent record ID and any fields you want to allow clients to update like Name and Email.
Step 4: Grab the Form URL
Once your form is set up, copy its URL.
Back in your Contacts table, create a new formula field called something like Form URL, and just paste the form link into the formula, in quotes "https://airtable.com/your-form-link"
This way, if the form ever changes, you only have one place to update it.

Step 5: Create a Pre-filled Form Link
Now, we want to make the form smart, so that when someone clicks it, it’s already filled out with their info.
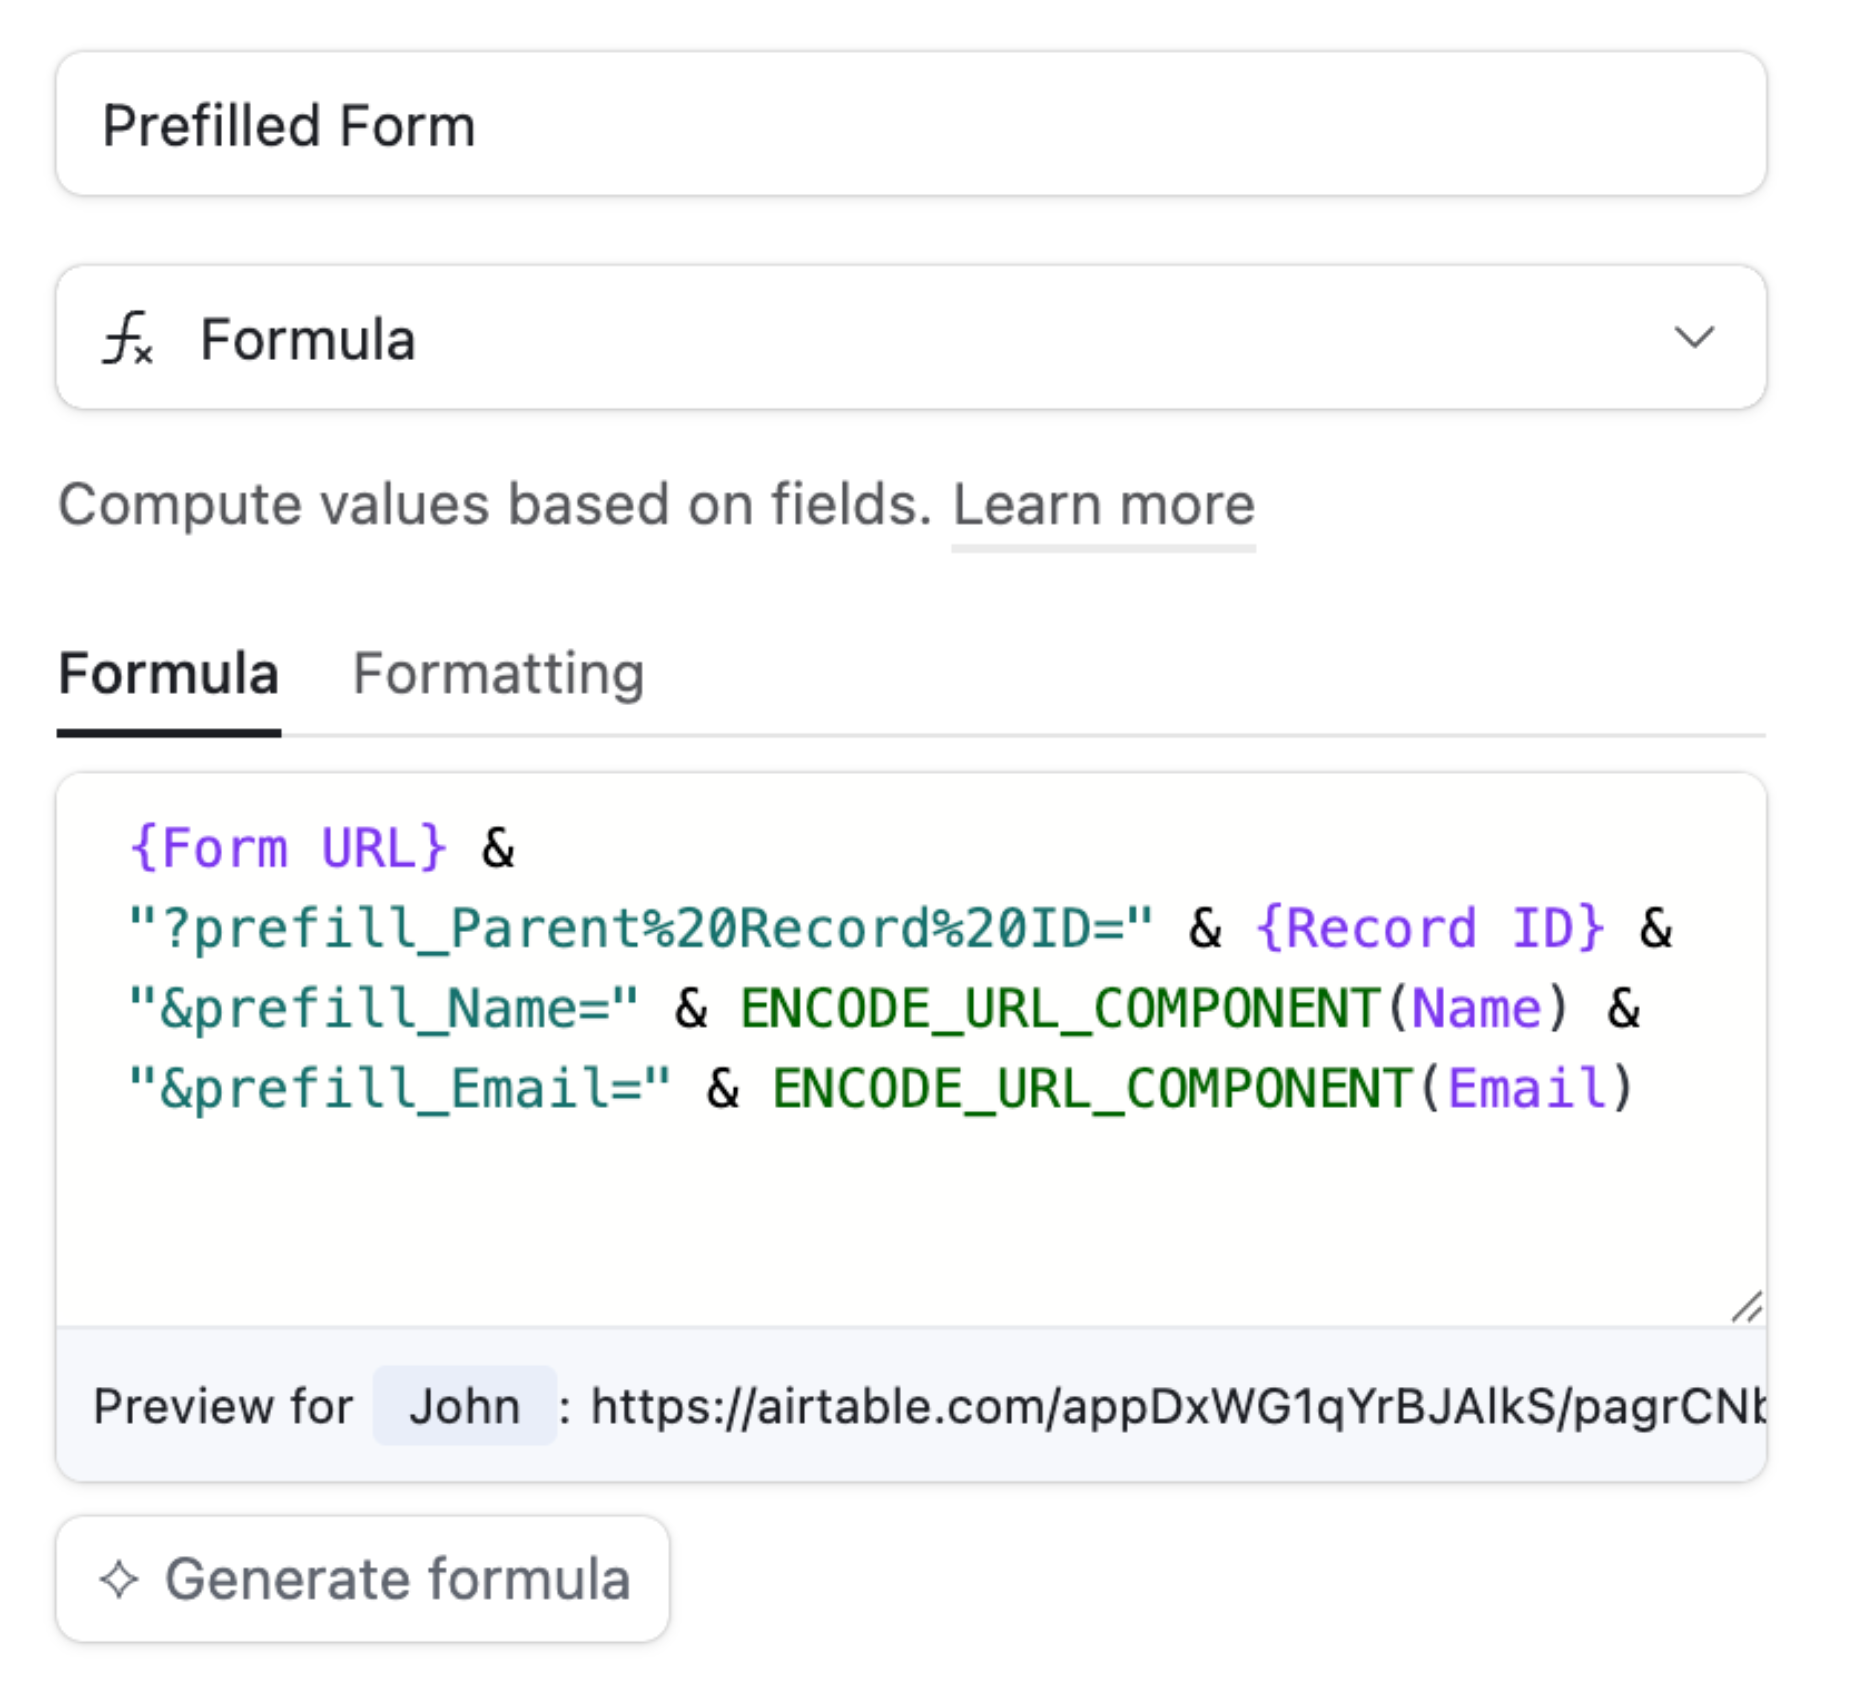
Create another formula field and call it Prefilled Form. Here’s where the magic happens.
You’ll build a URL using the form link and append parameters like this:
{Form URL} &

"?prefill_Parent%20Record%20ID=" & {Record ID} &

"&prefill_Name=" & ENCODE_URL_COMPONENT(Name) &

"&prefill_Email=" & ENCODE_URL_COMPONENT(Email)
A few things to keep in mind:
First, make sure the prefill field names match exactly with the field names in the Updates table, not the Contacts table.
Use ENCODE_URL_COMPONENT() to safely pass values into the URL.
You can also customize which fields are shown or filled based on the type of change you're supporting.
That way, when someone clicks the link, the form is already pre-filled with their current info and ready to be updated.
Step 6: Automate the Update
Now let’s make sure that when someone submits the form, the change actually updates the original record.
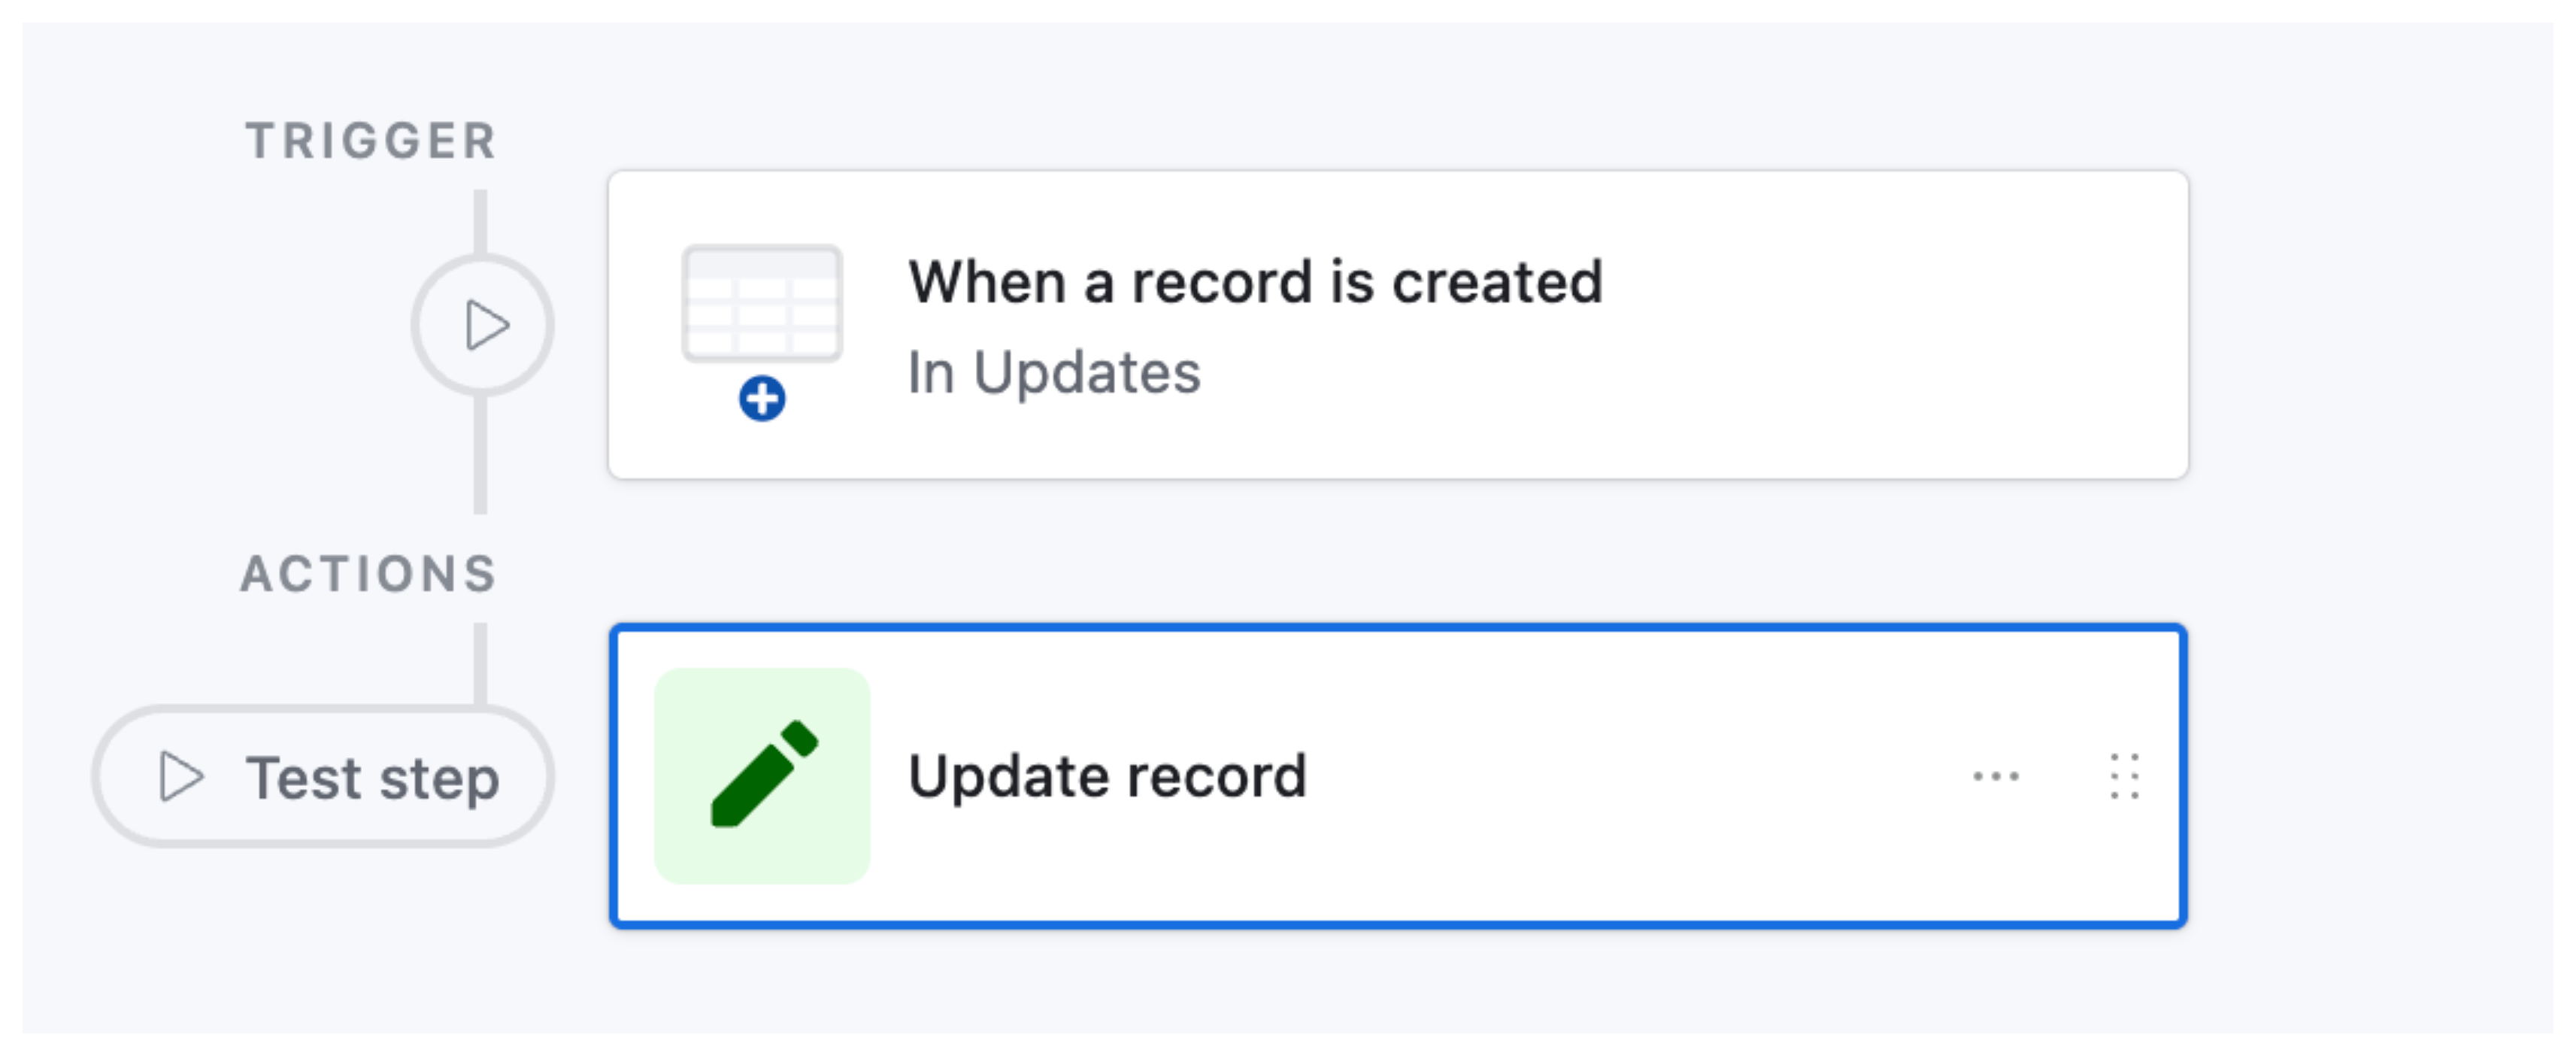
In Airtable, head over to Automations and set up a new one like this:
Trigger:
When a new record is created in the Updates table.
Action:
Update a record in the Contacts table.
Use the Parent Record ID to find the correct record, and update it with the new values from the form.
Step 7: Make It User-Friendly
Now let’s go the extra mile and add a button to make the update link even more accessible.
Create a button field in your Contacts table and configure it to open a URL. Use the Prefilled Form formula as the URL source.
This way, users can just click "Update" and go straight to a form that already has everything filled out, they just change what they need and submit.

Step 8: Share the Interface
Finally, create a read-only Interface of your Contacts table and share it with whoever needs access. In this interface, users can click a button to update records via the form, without ever touching the base itself.
They submit the form, your automation kicks in, and the changes appear almost instantly in the original table.
That’s It!
What you’ve just built is a simple but powerful system for editing Airtable records through forms, no need for any external tools. It’s clean and doesn’t clutter up your main base.
However, Airtable’s prefilled links also comes with a few downsides you should be aware of:
-
You’ll need to keep sending updated prefilled links to your users to ensure they always have the latest data. If someone accidentally clicks an outdated link, they’ll see old information in the form. This means users can’t reuse or bookmark a link.
-
Prefilled links don’t work well with all field types. For example, attachment fields or very long text fields can exceed the URL character limit, causing issues.
-
If you need to keep your data private or secure, prefilled links aren’t ideal because all the data is visible within the link itself.
If you’re running into any of these issues or want something even more seamless, Fillout is a great option and offers a generous free plan.
Once your update form is working, you will likely want to share it with clients through an interface. For the different ways to do that and what each option costs, see 6 Ways to Share Airtable Interfaces with Clients.
If you also want to send the submitter a confirmation email after they update a record, see How to Send a Confirmation Email After an Airtable Form Submission.