How to Show a Record ID After an Airtable Form Submission
When someone submits an Airtable form, the confirmation page can only display a static thank-you message. It cannot show values from the record that was just created, including the Airtable record ID or autogenerated fields like autonumber values.
This is a limitation of Airtable's native form experience. The confirmation page renders before the submission has fully finished processing, so the form has no access to the new record data.
Because of that, you cannot directly show the record ID on Airtable's built-in confirmation screen.
The practical workaround is to send the reference number after submission instead.
Option 1: Send the Reference Number by Email
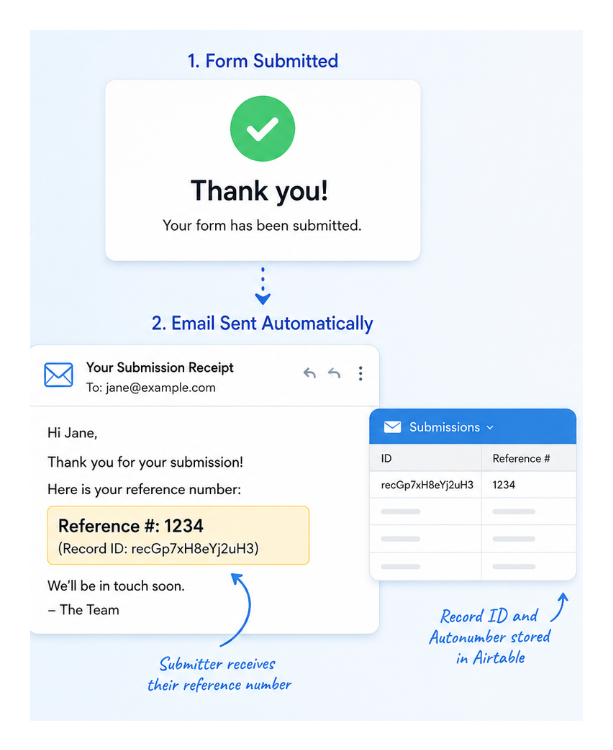
The most reliable approach is an automation that triggers immediately after the form is submitted and emails the submitter their reference number.
How to Set It Up
- Create a new automation in your Airtable base
- Choose the trigger When a form is submitted
- Select the form you want to use
- Add a Send email action
- Set the recipient to the email address field from the form
- Insert either the Record ID field or an Autonumber field into the email body using the token picker
After the form is submitted, the user sees the normal confirmation screen and then receives an email containing their reference number.
This workflow requires the form to collect the submitter's email address. If your form does not currently include an email field, add one and make it required.
For a more advanced confirmation email with dynamic links and additional submission data, see how to send a confirmation email after an Airtable form submission.
Record ID vs Autonumber
You can send either the Airtable record ID or a separate autonumber field.
The Airtable record ID looks something like this:
recXXXXXXXXXXXXXX
It works fine as a unique identifier, but it is not especially readable or user-friendly.
In most cases, an Autonumber field creates a better experience. Each new record automatically receives the next number in sequence (1, 2, 3...).
That number is easier for users to reference later in support requests, emails, or phone calls.
The automation setup is exactly the same either way.
Optional: Redirect to a Custom Confirmation Page
Airtable forms also support redirecting users to a custom URL after submission.
Instead of showing Airtable's default confirmation page, you can send users to your own thank-you page.
To configure this:
- Open the form settings in the Interface editor
- Find the After submission or Redirect URL setting
- Enter the URL of your custom page
Your page can explain what happens next, for example:
"Thank you for your submission. Your reference number will be emailed to you shortly."
This does not solve the underlying limitation. The redirect page still cannot dynamically access the newly created Airtable record ID without a more advanced API or webhook setup.
For most use cases, the email workflow is simpler and more reliable.
Option 2: Use Fillout
Fillout supports dynamic confirmation pages that can display values from the newly created Airtable record immediately after submission.
For example, you can show:
- an autonumber reference
- a ticket number
- calculated fields
- other submitted values
directly on the success screen.
This removes the need for a separate confirmation email just to communicate the reference number.
Fillout connects directly to your Airtable base, and the confirmation page is configured inside Fillout's form builder.
If you want to stay entirely inside Airtable, the email automation workflow is the most reliable solution. If showing the reference number instantly on-screen matters for the user experience, Fillout is the cleaner option.