How to Trigger External Systems from Airtable Using a Button and Webhook
You want a team member to click a button on a record and have that click immediately trigger something in an external system. Generate an invoice, push a notification, kick off a workflow in Make or Zapier, update a dashboard, create a document.
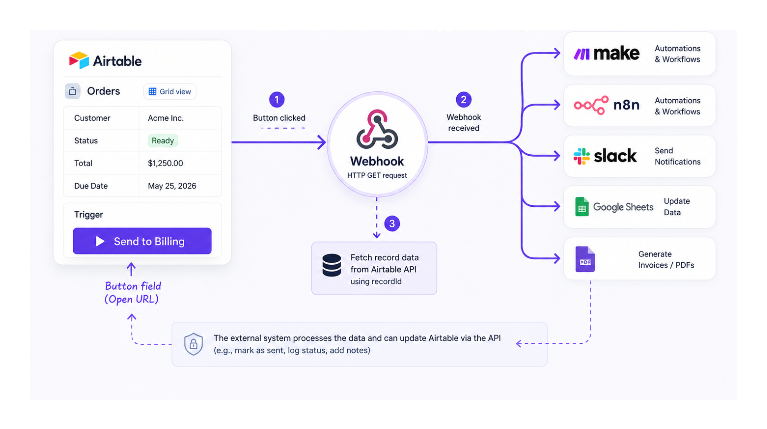
Airtable's button field combined with a webhook is the cleanest way to do this without any complex setup.
How It Works
A button field in Airtable can be set to open a URL when clicked. That URL can be a webhook endpoint. When the browser navigates to that URL, it sends an HTTP GET request to the webhook, which the receiving system uses as a trigger.
By embedding the Airtable record ID in the URL as a query parameter, you give the external system the information it needs to fetch all the record's details through the Airtable API and take action on them.
The user experience is simple: someone sees a record that is ready for the next step, clicks the button, and the external system handles the rest automatically.
Step 1: Get Your Webhook URL
You need a webhook receiver. The most common options:
Make: Create a new scenario in Make and add a Custom Webhook module as the trigger. Make generates a webhook URL for you. Copy it.
n8n: In n8n, create a workflow with a Webhook node as the trigger. Copy the webhook URL from the node settings.
Your own server: Any endpoint that accepts GET or POST requests and responds with a 200 status works.
Step 2: Create the Button Field
- In your Airtable table, click the plus icon to add a new field
- Choose Button as the field type
- Set the button label to something descriptive, for example "Send to Billing" or "Trigger Invoice"
- For the action, select Open URL
- In the URL formula box, build the URL using the formula editor:
"https://hook.us1.make.com/your-webhook-id?recordId=" & RECORD_ID()
Replace the base URL with your actual webhook endpoint. The & RECORD_ID() part appends the current record's Airtable record ID as a query parameter.
You can pass additional field values in the URL as well. For example, to also pass a status field:
"https://hook.us1.make.com/your-webhook-id?recordId=" & RECORD_ID() & "&status=" & ENCODE_URL_COMPONENT({Status})
Use ENCODE_URL_COMPONENT() around any field value that might contain spaces or special characters to keep the URL valid.
Step 3: What the Receiving System Does
When the button is clicked, the browser opens the webhook URL. The receiving system (Make, n8n, your server) receives the GET request with the record ID.
From there, the external system can:
- Call the Airtable REST API using the record ID to fetch all fields for that record
- Use the data to create a PDF invoice, update a Google Sheet, send a Slack message, or trigger any downstream process
- Optionally call back to Airtable via the API to update a field on the record, for example setting a "Sent to Billing" checkbox to checked, confirming the action completed
This pattern works for any external system that can receive a webhook. Because you are passing the record ID, the external system always has full access to the latest data rather than relying on values that were baked into the URL at the time the button was clicked.
Limitations to Know
Browser-based trigger: Clicking the button opens a new browser tab to the webhook URL. Most webhook receivers return a plain success response, so the user sees a blank or raw JSON page briefly before closing it. This is normal behaviour and does not indicate an error.
No confirmation in Airtable: Airtable does not know whether the external system processed the request successfully. If the webhook fails, there is no error shown to the user in Airtable. To handle this, have the external system write back to Airtable via the API to update a status or log field on the record after processing.
One record at a time: The button triggers one record at a time. For batch processing of multiple records, use a scheduled automation with a Find records step rather than a manual button. See how to send automated follow-up emails for an example of the scheduled automation pattern.
Triggering Automatically Without a Button Click
The button approach requires someone to click manually. If you need the external system to be triggered automatically when a record changes without any manual action, use an Airtable automation with a Run a script action instead.
Set the automation trigger to When a record is updated (or any other trigger that fits your workflow). Inside the automation, add a Run script action and use the fetch API to call your webhook URL:
let config = input.config();
let url = "https://your-webhook-url.com?recordId=" + config.recordId;
await fetch(url);
Define the input variables (recordId, or any other fields you need to pass) in the left panel of the automation editor before running. This sends the webhook call the moment the trigger condition is met, with no user interaction required.
Make provides a Webhook Response module that lets you customise what response the automation receives back, which is useful if you want the automation to verify the external system processed the request correctly.
Alternative: Use the Run Automation Button Action
Instead of Open URL, the button field also supports a Run automation action. This triggers an Airtable automation directly when the button is clicked, without needing a webhook URL.
The automation can then use a Send webhook action to call an external system. This keeps the webhook URL hidden from users (it is stored in the automation, not visible in the button formula) and gives you more control over what data is sent and how errors are handled.
For workflows that send structured data to external systems regularly, this approach combined with Make as the webhook receiver gives you a cleaner and more maintainable setup than the open URL approach.